
When you need some code to execute on a Windows machine even when a windows user is not logged in (unlike a Windows Forms application), Windows Service (https://en.wikipedia.org/wiki/Windows_service) serves the purpose.
This article shows how to:
- create a Windows Service using Visual Studio
- install and uninstall it using command prompt
In Visual Studio, create New Project -> Visual C# -> Windows -> Classic Desktop -> Windows Service.
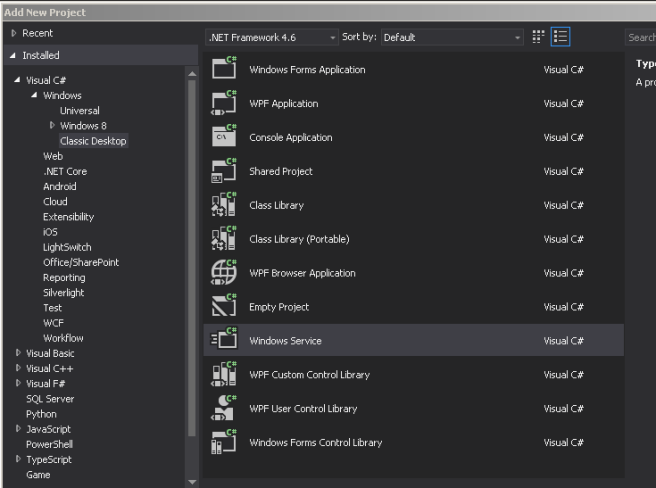
If you cannot find the above mentioned path, search for “Windows Service” in the search bar in the right side top corner of the “Add New Project” window.
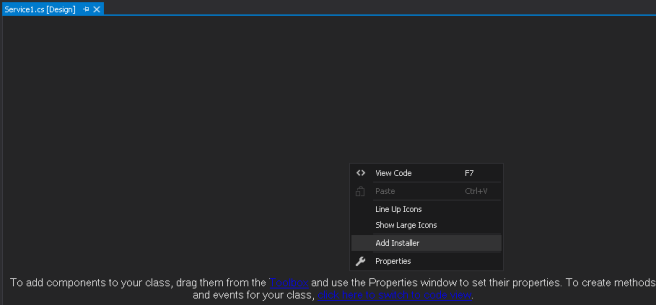
By default you will see Service1.cs file in the Solution Explorer. Double click on the Service1.cs file to go to Design view. Right click on the Design view and “Add Installer”.
Now highlight Service1.cs in Solution Explorer and press F7 to view code. Here is the basic code I have added to make it work.
“#if !DEBUG” directive and OnDebug() methods are useful to debug the service locally without installing.
The code you would like the Windows Service to execute should be inside OnStart() method.
Other code is boiler plate code to check and set the service status.
using System;
using System.Runtime.InteropServices;
using System.ServiceProcess;

namespace WindowsService1
{
    public partial class Service1 : ServiceBase
    {
        [DllImport("advapi32.dll", SetLastError = true)]
        private static extern bool SetServiceStatus(IntPtr handle, ref ServiceStatus serviceStatus);

        public Service1()
        {
            InitializeComponent();

#if !DEBUG
            ServiceController controller = new ServiceController("My Windows Service");
            if (controller.Status == ServiceControllerStatus.Stopped)
                controller.Start();
#endif
        }

        protected override void OnStart(string[] args)
        {
            var serviceStatus = new ServiceStatus
            {
                dwCurrentState = ServiceState.SERVICE_START_PENDING,
                dwWaitHint = 100000
            };
            SetServiceStatus(ServiceHandle, ref serviceStatus);

            // Update the service state to Running.
            serviceStatus.dwCurrentState = ServiceState.SERVICE_RUNNING;
            SetServiceStatus(ServiceHandle, ref serviceStatus);

            // Your code goes here
        }

        protected override void OnStop()
        {
            // Do the cleanup
        }

        public void OnDebug()
        {
            OnStart(null);
        }

        public enum ServiceState
        {
            SERVICE_STOPPED = 0x00000001,
            SERVICE_START_PENDING = 0x00000002,
            SERVICE_STOP_PENDING = 0x00000003,
            SERVICE_RUNNING = 0x00000004,
            SERVICE_CONTINUE_PENDING = 0x00000005,
            SERVICE_PAUSE_PENDING = 0x00000006,
            SERVICE_PAUSED = 0x00000007,
        }

        [StructLayout(LayoutKind.Sequential)]
        public struct ServiceStatus
        {
            public long dwServiceType;
            public ServiceState dwCurrentState;
            public long dwControlsAccepted;
            public long dwWin32ExitCode;
            public long dwServiceSpecificExitCode;
            public long dwCheckPoint;
            public long dwWaitHint;
        };
    }
}
Windows Service can be installed using Command Prompt. Open cmd.exe as Administrator.
Navigate to the Installutil.exe in the .net folder by typing the following two commands. Navigate to “v4.0.303192” folder or the framework version folder you have on your machine. Also choose “Framework” instead of “Framework64” if your program targets 32 bit (x86) machines.
cd C:\Windows\Microsoft.NET\Framework64\v4.0.303192
and then run
Installutil.exe /i “Path_to_Windows_Service_Exe_file”
Follow the path below to see if the Service is started. The status column should say “Started”.
Start –> Control Panel –> Administrative Tools –> Computer Management –> Services and Applications –> Services –> My Windows Service.
Navigate to the Installutil.exe in the .net folder by typing the following two commands. Navigate to “v4.0.303192” folder or the framework version folder you have on your machine. Also choose “Framework” instead of “Framework64” if your program targets 32 bit (x86) machines. To uninstall the service, run the command:
cd C:\Windows\Microsoft.NET\Framework64\v4.0.303192
and then run
Installutil.exe /u “Path_to_Windows_Service_Exe_file”
If uninstall is successful, you will see the message “The uninstall has completed.” and the service will not be seen in the Services window.
Sometimes, there may an error when installing the windows service. Follow the steps below to fix it.
- Right-click the service project in Visual Studio, go to “Properties”
- If “Startup object” is “Not Set”, change it to the name of the service by choosing from the drop-down.
- Build the project and try running Installutil.exe
After the install is successful, YourProgram.InstallLog and YourProgram.InstallState files will be created in the same folder as YourProgram.exe.
