How to create a PDF file from an Excel Sheet (using C#)

The task is to create a PDF file from each sheet in each Excel file in a folder using C#. Here is one way to do it.

Import the following libraries.

using Microsoft.Office.Interop.Excel;
using System.Runtime.InteropServices;
using Application = Microsoft.Office.Interop.Excel.Application;

Access the Excel files as follows:

var directoryinfo = new DirectoryInfo(folderPath);
var files = from f in directoryinfo.GetFiles() where f.Extension.ToLower().Contains("xls") || f.Extension.ToLower().Contains("xlsx") select f;
var fileInfosList = files.ToList();
Workbook workBook = null;
object misValue = System.Reflection.Missing.Value;
Application app = new Application();

Loop through each file, then loop through each sheet in each file.

foreach (FileInfo fileInfo in fileInfosList)
{
 try
 {
  workBook = app.Workbooks.Open(fileInfo.FullName, 0, true, 5, "", "", true, XlPlatform.xlWindows, "\t", false, false, 0, true, 1, 0);
  Sheets workSheets = workBook.Worksheets;
  string fileName = Path.GetFileNameWithoutExtension(fileInfo.FullName);
  string folderName = fileInfo.DirectoryName;

  foreach (Worksheet workSheet in workSheets)
  {
   workSheet.PageSetup.Orientation = XlPageOrientation.xlLandscape;
   workSheet.PageSetup.FitToPagesWide = 1;
   workSheet.PageSetup.Zoom = false;
   workSheet.PageSetup.LeftMargin = 10;
   workSheet.PageSetup.RightMargin = 10;
   workSheet.PageSetup.TopMargin = 10;
   workSheet.PageSetup.BottomMargin = 10;

   string sheetname = workSheet.Name;
if (folderName != null)
{
    string destinationPath = Path.Combine(folderName, fileName + "_" + sheetname + ".pdf");

    if (!File.Exists(destinationPath))
{
     workSheet.ExportAsFixedFormat(XlFixedFormatType.xlTypePDF, destinationPath);
    }
   }
 }
catch (Exception ex)
{
// Log the exception
workBook?.Close(false, misValue, misValue);
app.Quit();
}
app.Quit();
}

That should do it!

The magic method is “ExportAsFixedFormat(XlFixedFormatType.xlTypePDF, destinationPath)” that creates the PDF file.

Before running the code, you will have to “Autofit Column Width” in Excel for each sheet to make sure the content is not truncated in the PDF.

How to access Outlook (Office365) Emails using C#

The task I was assigned was to:

  • access an Outlook account from a C# program
  • read the content of each email
  • parse the content into a database and
  • move the emails to a folder (“Processed” folder for example).

To start, I created a Console application using Visual Studio. Added a reference to Microsoft.Office.Interop.Outlook library using NuGetPackage Manager.

NugetPackage

Once you add this library to your references, the following code should work.

Add this line in the usings section:

using Outlook = Microsoft.Office.Interop.Outlook;

Here is the class file with the logic.

public static void ReadEmails()
{
  try
  {
    Outlook.Application oApp = new Outlook.Application();

    // Get the MAPI namespace.
    Outlook.NameSpace oNs = oApp.GetNamespace("MAPI");

    oNs.Logon("Orders@company.com", System.Reflection.Missing.Value,
    System.Reflection.Missing.Value, System.Reflection.Missing.Value);

    Outlook.MAPIFolder inboxFolder = oNs.Folders["Account1"].Folders["Inbox"];
    Outlook.MAPIFolder processedFolder =
    oNs.Folders["Account1"].Folders["Processed"];

    Console.WriteLine(inboxFolder.Items.Count);
    foreach (Outlook.MailItem mailItem in inboxFolder.Items)
    {
      // read the email only if its unread
      if (mailItem.UnRead)
      {
         Console.WriteLine(mailItem.Subject);
         Console.WriteLine(mailItem.SenderName);
         Console.WriteLine(mailItem.ReceivedTime);
         Console.WriteLine(mailItem.Body);

         var body = mailItem.Body;
         if (!string.IsNullOrEmpty(body))
         {
            // parse the email body as needed
         }

         // check for attachments
         if (mailItem.Attachments.Count > 0)
         {
            // process the attachments as desired
         }

         // mark the email as read
         mailItem.UnRead = false;

         // Based on the folder structure, move the email to a particular folder
         mailItem.Move(processedFolder);
      }
    }

    oNs.Logoff();
  }
  catch (Exception e)
  {
    Console.WriteLine("{0} Exception caught: ", e);
  }
}

Notice that the code looks for “Account1”. You would use this code when you have access to more than one Outlook accounts/Folders and you want to access the account/Folder with name “Account1”.

If you do not know the name of your account/Folder, you can get the names of your accounts/Folders using the following code.

var folders = oNs.Folders;

The property that will give you the name of the Folder is the “FolderPath”.

But, if you only have one email account to access, this line will return the inbox.

Outlook.MAPIFolder inboxFolder = oNs.GetDefaultFolder(Outlook.OlDefaultFolders.olFolderInbox);

That’s it. Hope that helps!

How to create a Windows Service in Visual Studio and install/uninstall it

When you need some code to execute on a Windows machine even when a windows user is not logged in (unlike a Windows Forms application), Windows Service (https://en.wikipedia.org/wiki/Windows_service) serves the purpose.

This article shows how to:

  • create a Windows Service using Visual Studio
  • install and uninstall it using command prompt

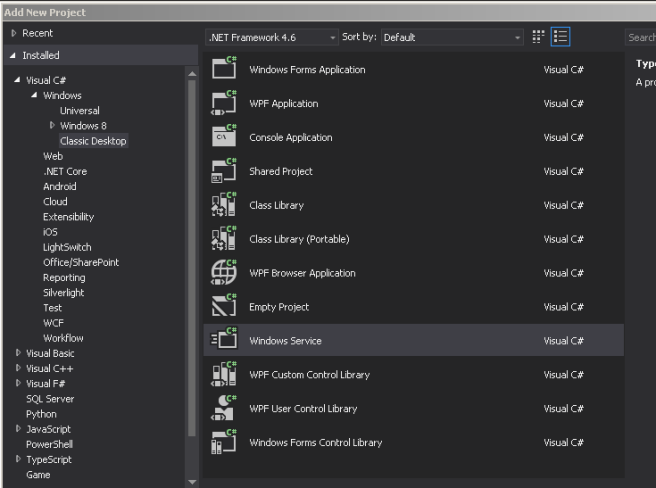
In Visual Studio, create New Project -> Visual C# -> Windows -> Classic Desktop -> Windows Service.
Capture

If you cannot find the above mentioned path, search for “Windows Service” in the search bar in the right side top corner of the “Add New Project” window.

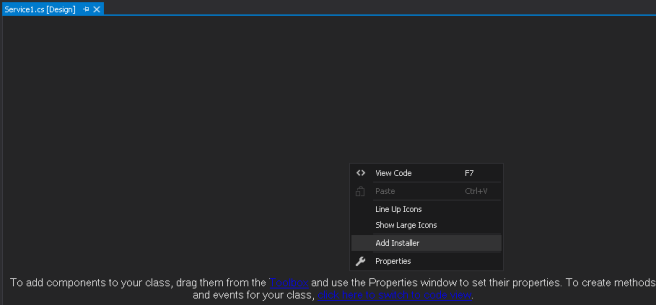
By default you will see Service1.cs file in the Solution Explorer. Double click on the Service1.cs file to go to Design view. Right click on the Design view and “Add Installer”.
Capture1

Now highlight Service1.cs in Solution Explorer and press F7 to view code. Here is the basic code I have added to make it work.

“#if !DEBUG” directive and OnDebug() methods are useful to debug the service locally without installing.

The code you would like the Windows Service to execute should be inside OnStart() method.

Other code is boiler plate code to check and set the service status.

using System;
using System.Runtime.InteropServices;
using System.ServiceProcess;

namespace WindowsService1
{
    public partial class Service1 : ServiceBase
    {
        [DllImport("advapi32.dll", SetLastError = true)]
        private static extern bool SetServiceStatus(IntPtr handle, ref ServiceStatus serviceStatus);

        public Service1()
        {
            InitializeComponent();

#if !DEBUG
            ServiceController controller = new ServiceController("My Windows Service");
            if (controller.Status == ServiceControllerStatus.Stopped)
                controller.Start();
#endif
        }

        protected override void OnStart(string[] args)
        {
            var serviceStatus = new ServiceStatus
            {
                dwCurrentState = ServiceState.SERVICE_START_PENDING,
                dwWaitHint = 100000
            };
            SetServiceStatus(ServiceHandle, ref serviceStatus);

            // Update the service state to Running.
            serviceStatus.dwCurrentState = ServiceState.SERVICE_RUNNING;
            SetServiceStatus(ServiceHandle, ref serviceStatus);            

            // Your code goes here
        }

        protected override void OnStop()
        {
            // Do the cleanup
        }

        public void OnDebug()
        {
            OnStart(null);
        }

        public enum ServiceState
        {
            SERVICE_STOPPED = 0x00000001,
            SERVICE_START_PENDING = 0x00000002,
            SERVICE_STOP_PENDING = 0x00000003,
            SERVICE_RUNNING = 0x00000004,
            SERVICE_CONTINUE_PENDING = 0x00000005,
            SERVICE_PAUSE_PENDING = 0x00000006,
            SERVICE_PAUSED = 0x00000007,
        }

        [StructLayout(LayoutKind.Sequential)]
        public struct ServiceStatus
        {
            public long dwServiceType;
            public ServiceState dwCurrentState;
            public long dwControlsAccepted;
            public long dwWin32ExitCode;
            public long dwServiceSpecificExitCode;
            public long dwCheckPoint;
            public long dwWaitHint;
        };
    }
}

Windows Service can be installed using Command Prompt. Open cmd.exe as Administrator.

Navigate to the Installutil.exe in the .net folder by typing the following two commands. Navigate to “v4.0.303192” folder or the framework version folder you have on your machine. Also choose “Framework” instead of “Framework64” if your program targets 32 bit (x86) machines.

cd C:\Windows\Microsoft.NET\Framework64\v4.0.303192

and then run

Installutil.exe /i “Path_to_Windows_Service_Exe_file”

Follow the path below to see if the Service is started. The status column should say “Started”.
Start –> Control Panel –> Administrative Tools –> Computer Management –> Services and Applications –> Services –> My Windows Service.

Navigate to the Installutil.exe in the .net folder by typing the following two commands. Navigate to “v4.0.303192” folder or the framework version folder you have on your machine. Also choose “Framework” instead of “Framework64” if your program targets 32 bit (x86) machines. To uninstall the service, run the command:

cd C:\Windows\Microsoft.NET\Framework64\v4.0.303192

and then run

Installutil.exe /u “Path_to_Windows_Service_Exe_file”

If uninstall is successful, you will see the message “The uninstall has completed.” and the service will not be seen in the Services window.

Sometimes, there may an error when installing the windows service. Follow the steps below to fix it.

  • Right-click the service project in Visual Studio, go to “Properties”
  • If “Startup object” is “Not Set”, change it to the name of the service by choosing from the drop-down.
  • Build the project and try running Installutil.exe

After the install is successful, YourProgram.InstallLog and YourProgram.InstallState files will be created in the same folder as YourProgram.exe.